This time around, hopefully you will learn:
*How to set material on your object.
*How to use the Zproject brush to transfer premade textures to the object.
*How to use the color picker to select colors for polypainting.
*How to polypaint, using the different brush strokes and settings.
*How to use alphas to create realistic painting effects.
*How to change said color to a texture, and use said texture for final sculpting.
*How to export that texture and the object for use in Second Life.
If you recall, we had just sculpted a nice red wax skull. We save this as a Ztool (not an object just yet), then watch Vlad Bjornson’s tutorial on how to use Zproject to polypaint :D
Just to recap, however, I will review the use of the Zproject brush here. First we need to change the material of the skull. The material really won’t do anything to the actual texture we create, but it affects what we see in Zbrush. In other words, while the final texture colour is independent of the material colour, whilst we are working on it, the material will change how the texture looks to use. Long explanation short, red wax makes the texture look red, so we want something nice and white such as White Matcap.
Just as we did when we changed the material of the sphere before sculpting, make sure “M” is on, select White Matcap from the materials palette, go up to “color” and “Fill Object”. Now, make a new document (Cntrl-N, or go to “document” at the top). Go to the texture palette and import a nice texture you want to put on the skull, select Flat Color for the material, then crop and fill the texture to the background. I used some copyright free images of skulls that I bought online, but I believe Wikipedia Commons has some nice common domain images of various skulls. It doesn’t have to be human, just look for some nice bone textures and cracks.
Next, select “texture off” on the texture palette, White Matcap on material palette, and select our skull. Draw it out, then go to edit (hotkey T). Open up the geometry palette, and click it five times. If you look at the upper right, you will see that you have about a million active points.
Make sure Rgb is on, and Zadd/Zsubtract/Zcut are all off. Select the Zproject brush and set RgbIntensity to 100 Position the skull over the image, and run the Zproject brush over it. The texture underneath will transfer to the skull. Rotate and scale the skull as needed to cover the key parts of the skull with bone textures. You can also use the transpose handle to more precisely place textures. Go to Move (hotkey W) and then draw the handle from where you want the texture to the part of the texture you wish to transfer (think of Photoshop’s Clone brush). Go back to Draw (hotkey Q) and Zproject away!
After a while, this is what I came up with.
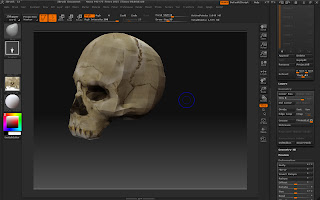
Not bad, but it looks a tad flat and pasted together, not to mention the fact that large parts are still not textured. This is where we go to more traditional style painting in Zbrush.
First, let’s pick a color to paint. There are two basic ways to pick color in Zbrush: either by picking one from the color picker or by using the “eyedropper” to select one from the image. In the lower left corner you will see the color picker.
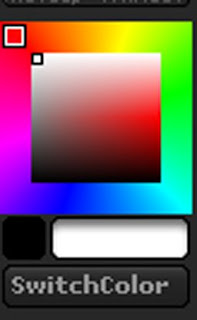
The outside square is where one picks the color. Click on the desired color, and it becomes the active color. The central box controls luminosity and saturation. Again, click on the desired color. Like Photoshop, there are two colors stored, the active one the brush is using (in the big box below the picker) and the secondary one (in the small box). You can swap between those two colors whenever you wish by clicking “SwitchColor”.
Personally, though, I find myself using the eyedropper more, as it guarantees a good match. Click on the box in the color picker, then drag the mouse/pen over to any point on the object or background, then release the button (lift the pen). The color at that point will become the active color.
So, let’s pretty the skull up. First, select the Standard brush, which is what one uses for painting most of the time. Make sure only the Rgb button is selected on top, set the RgbIntensity to about 30 and the size to about 35. Underneath the brush type you will see the icon for the stroke, which is probably still at the default “dots”. Click on this and select “Drag Rec”. This is a nifty brush that will draw out a rectangle as you run it over the object. Try it, and you’ll see what I mean.
So, I selected various colours from the skull and started filling in the empty spots and increasing the shading underneath the skull (remember, once a color is selected, you can adjust luminosity and saturation). The key to making things look realistic is multiple washes. Natural things are rarely one blocky colour. So, take your time, pick a few different colours and set them at a medium RgbIntensity.
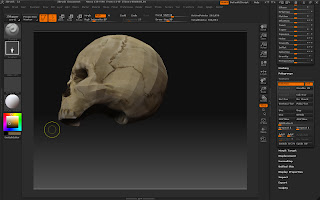
Now, let’s do some final touch up. Here’s some things I did. The nose shading got a bit outside, so I picked a color next to it to cover it up. But again, I didn’t want a blocky look, so I need a way to break up the texture. Here is where I used “alphas”. Think of these like the nozzle on a pastry bag—they screen off the brush, creating interesting effects. Here, I just wanted a pebbly look, so I clicked on Alpha (below the brush type) and selected Alpha 7. I went back to the dot brush, and started lightly painting around the nose.
Finally, I wanted a bit of a porous look to the bone, so I picked a dark shade and a low RgbIntensity. But I wanted even more variation, so I selected “color spray” out of the brush types, which automatically provides a bit of variation in color. I worked my way over the skull to make it look nice and rough.
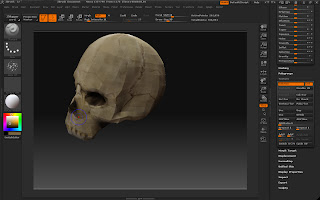
And there we have our basic texture! In the texture subpalette in the tool palette on the right, select “Col>Txr”. You will see a picture of the texture appear on the left under “texture” (I really, really hate the way Pixologic reuses names for different palettes!!!! Whoops, I said that before). Click on that and select “Export”. Now your texture is saved as a PSD file.
We can now do a few final tweaks to our skull, using the texture as a reference. Open up our original saved Ztool of the skull, from just before we divided its geometry in order to paint. Set the material to Matcap White if it isn’t, and go the texture palette on the left, and select the skull texture we just made. It will look a bit blockier, as it hasn’t the resolution of the Ztool we used to create the texture. So, we may have to adjust it slightly using our sculpting tools. I frequently will use the Move brush and Nudge brush to make sure ridges (such as the brows) have a nice row of vertices running along them. Notice that when you switch brush types, the texture disappears. To get it to reappear, simply open the texture palette and reselect the texture. It then becomes that brush’s texture, and you can proceed as before.
Once you’re satisfied, save the new skull as a Ztool. I discussed Sculpty Maker in my tutorial on animation, and it will work just fine here, too. To use that, simply export the Ztool as an Obj file, then open SculptyMaker, browse to the object file and click “make sculpty”. It will create a BMP sculpty file. If you haven't used Sculpty Maker before, I have a more detailed explanation here
Believe it or not, there’s an even easier way to do this now. 2K Suisei created a plug in for ZBrush called ZSculpty. Go here to download it:
http://www.mediafire.com/?ixxoxsizyx0
Then, using your unzipping thingee (I use WinZip these days), unzip the files to something that looks like this:
C:\Program Files\Pixologic\ZBrush3\ZStartup\ZPlugs
(it might not be exactly there on your computer, just make sure you send it to the ZPlugs folder)
Then restart ZBrush and load your skull, draw it out, then go to edit mode. On the right hand Tool palette, all the way at the bottom, you will see “Sculpty”. Just click on that and you will see this palette:
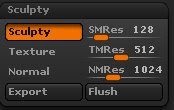
Click on the “Sculpty” button to turn it on, and set the SMRes to your desired sculptmap size. I’ve been using 128 lately with good results and load times, even when not lossless. Note that 2K has also set this up so that you may export the object’s texture as well as a normal map (which is a bit like the bumpmaps we use in Second Life, but not really. One will note I didn’t say I understood them!). Anyway, once set, click “export” and it will create a BMP sculpt map for the selected object. Said sculpt map can be found in the ZSculpty Maps folder, also located in the Zplugs folder. If it gets too cluttered there, you can click “flush” and ZSculpty will delete all the sculpt maps inside.
So, there we have it: a lovely little skull, all textured and everything. Next time, I will talk about how to use a program called Material Baker to create additional shading for our skull, which will make it look even spiffer!
2 comments:
wounderfull Blog iamnot shure but i think i search for about over a year for this zplugin for Zbrush .Know 2k suszies older tools.How about making your tutorial as a video ?
its soo mutch fun doing Sculpts in Zbrush.
Thanks again and keep on yfour great Blog
Thank you for the kind words, Mohab. The zplugin makes things so amazingly easy, although for merged subtools you will still need to use SculptyMaker. I really cannot say enough good things about 2K's work: without him, using Zbrush for Second Life would be much much more difficult, and some things (such as matching up sculpt sizes for anims) impossible.
Post a Comment