
Wednesday, December 24, 2008
Monday, December 15, 2008
Touring Sleigh is Here!!!
HOLIDAY SPECIAL!! I'm selling the sleigh tour system for only 1500L until mid-January. Similar systems run over twice as much, or even more. I truthfully believe it is the best horse drawn touring system on the market right now, but I want people to get a chance to use it and show it off to friends and visitors. Besides, it's Christmas!

I know, I know. You can just go to Eyre and ride it around for free. But for those of you who Brave the Wilds of Other Sims, you might think about taking advantage of my Christmas Sale to have a sleigh tour of your very own! The sleighs can be set to become temp rez when a passenger sits on them, so you only need to have a free prim on your own parcel.
In World at the Carriage House:
http://slurl.com/secondlife/Caledon%20E ... 20/183/23/
Or online at:
http://www.xstreetsl.com/modules.php?na ... ID=1074883
This beautiful sleigh and horse will take visitors for a guided tour that you create. Smooth motion and amazingly realistic animation combine to create an true winter wonderland experience. The Cheval Verite touring script is easy to use, but permits customization such as automatic announcements, delays, stops and rotations to face scenic outlooks. Create a permanent touring vehicle, or use the temp vehicle which turns to a temp-rez object (does not count against parcel prims) when passengers sit on it.
Come see it in action at the Cheval Verite Carriage House in Caledon Eyre:
http://slurl.com/secondlife/Caledon%20E ... 20/183/23/
Sleigh Features include:
--Sculpted prim animation. No "missing legs" or stiff prim rotations.
--Horses wiggle their ears, occasionally stamp their feet when paused and make horsie noises.
--Cheerful Jingle Bell sound.
--Copy/Mod, so you can create as many vehicles as you like, and add custom features such as your own poseballs or decorations.
--Prim limited? No worries! Simply set the sleigh to temp rez and put it in the rezzer. Visitors then can touch the rezzer to get a vehicle to ride. This means you only need one prim available.
--Or leave the sleigh out. When someone sits on it, it becomes temp rez (ZERO parcel prims) heads off, and the rezzer automatically rezzes another sleigh in its place.
--OR use the permanent sleigh, and just have it loop about on a tour.
--Sleigh can be set to sit still at any designated waypoint until a passenger sits on it
--Sleigh can be set to self destruct at the end of the tour (no sleighs need clutter up your sim!)
About the Cheval Verite Touring System--
--Smooth motion, with no pauses at waypoints (unless programmed in)
--Uses Global Coordinates, which makes for smooth and easy sim crossings.
--Coordinates are entered on the notecard in easy to understand Local format.
--Drop down menu accesses the position detector, which allows for precision coordinates with no guess work.
--Preloaded Notecard system combines the low lag feature of notecardless systems with the easy of use and customizability you get from storing the route on a notecard. Want another vehicle to follow the same route? Simply copy and drop the notecard into it!
--Automatically points in direction of travel (but can be set to rotate to a specific direction at a waypoint if you like)
--Automatically tilts up and down when climbing or descending.
--At each waypoint, can be preprogrammed to wait for a specified period of time, wait until someone gets on, rotate to face a specific direction, say anything you like in chat, or self destruct at the end of the tour (quietly!).
If you have any questions at all, please send me a notecard/IM and I'll be happy to answer you!
-Miss Virrginia Tombola
Owner, Cheval Verite/La Bicyclette
Wednesday, November 26, 2008
Real Victorian Horsie Walking

More fun with GIF animations :) This is from the 1887 work by Muybridge, the very first (and still a very important) stop motion study of animals in motion. I've used it extensively in my own horse animations, and now through the magic of freebie software bundled with Photoshop, I strung his photographs of a horse walking together into what I modestly consider almost a passable animation.
Tuesday, November 25, 2008
Grrrr...GIF

Edit: Thanks, Dia! Of course now it seems perfectly obvious. Blogger does not support animation. So, the way to do the animation is to host it on another site (I use Photobucket) and enter a direct link there.
La! One silly animated Seahorse :))
Monday, November 24, 2008
Sleigh Rides
Oh, jingle bells, jingle bells
Jingle all the way
Oh, what fun it is to ride
In a one horse open sleigh
Jingle bells, jingle bells
Jingle all the way
Oh, what fun it is to ride
In a one horse open sleigh
Well, as those of you who experienced the Great Sleigh Infestation in Caledon Eyre might know, the last few days have had me busy as the Dickens (/rimshot) making sleighs for the Holidays. I do apologize to those whose houses were overrun on Friday with the replicating Touring Sleighs!
I've made two types of sleighs. The first is the Victorian, two horse sleigh which uses the same vehicle engine that I made for the Royal Carriages. Most of the animations remain the same, but thanks to Jaeger M. Szondi, it also makes snow :) And instead of a wheel sound, it has the obligatory jingle bells.

The other sleigh is not quite ready for sale yet (mostly, I need to make it more user friendly). It's a Touring Sleigh, which automatically will wend its way about a prearranged course. It can be set to be either permanent or temp-rez, the latter meaning it doesn't take require more prim space than the one prim rezzer! Still, I kept the prims fairly low by using sculpted animation for the horse's legs.

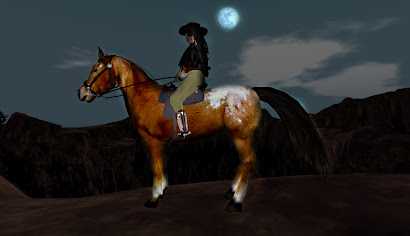
I actually extremely proud of this one, so if you wish to assuage my vanity, please drop by the Carriage House and touch the picture of the sleigh. It will rez a sleigh which will then take you on a guided tour of Eyre and Regency. I hope to expand that and have it range its way from Kittiwick to Penzance with time (I'm trying to provide service in the trainless sections of Caledon). When the snows melt, I plan to turn it back to Hansom cabs.
Jingle all the way
Oh, what fun it is to ride
In a one horse open sleigh
Jingle bells, jingle bells
Jingle all the way
Oh, what fun it is to ride
In a one horse open sleigh
Well, as those of you who experienced the Great Sleigh Infestation in Caledon Eyre might know, the last few days have had me busy as the Dickens (/rimshot) making sleighs for the Holidays. I do apologize to those whose houses were overrun on Friday with the replicating Touring Sleighs!
I've made two types of sleighs. The first is the Victorian, two horse sleigh which uses the same vehicle engine that I made for the Royal Carriages. Most of the animations remain the same, but thanks to Jaeger M. Szondi, it also makes snow :) And instead of a wheel sound, it has the obligatory jingle bells.

The other sleigh is not quite ready for sale yet (mostly, I need to make it more user friendly). It's a Touring Sleigh, which automatically will wend its way about a prearranged course. It can be set to be either permanent or temp-rez, the latter meaning it doesn't take require more prim space than the one prim rezzer! Still, I kept the prims fairly low by using sculpted animation for the horse's legs.

I actually extremely proud of this one, so if you wish to assuage my vanity, please drop by the Carriage House and touch the picture of the sleigh. It will rez a sleigh which will then take you on a guided tour of Eyre and Regency. I hope to expand that and have it range its way from Kittiwick to Penzance with time (I'm trying to provide service in the trainless sections of Caledon). When the snows melt, I plan to turn it back to Hansom cabs.
Wednesday, November 19, 2008

Tuesday, November 18, 2008
Seahorses are HERE!!!
Care to sport about the Firth a bit? We're absurdly proud of this one. The Vicerine really outdid herself with the engine--this is NOT simply an animated attachment, it propels you forward at astonishing speeds (or can be slowed to a crawl), leaps out of the water in a fully animated dolphin leap, climbs/dives, and will automatically shoot to the surface or bottom on command. Or you can put it in fly mode.
I did my usual foolishness with design--the eyes blink and look around, the tail wiggles, it looks like a seahorse.
With no further ado, onto ad copy ;)
Inworld at Lionsgate or the Carriage House:
http://slurl.com/secondlife/Caledon%20Lionsgate/85/10/30
http://slurl.com/secondlife/Caledon%20Eyre/48%20/183/23/
On the XStreet Exchange (formerly the SL Exchange):
http://www.xstreetsl.com/modules.php?name=Marketplace&file=item&ItemID=1024229

For Mers and Landlubbers alike!
Explore the World, below and above the waves, with your amazing Seahorse. Not just an animation override, it uses the unique P.I.E. engine which combines vehicle-like maneuverability and speed with the reliability of an attachment vehicle. Swim or fly at speeds ranging from a turtle’s stroll to a dolphin’s sprint. Leap out of the water in a spray of water. See your seahorse climb and dive, or just bob along contentedly while you take in the scenery.
-Worn as an attachment, the seahorse does not count against parcel prims, and will go with you when you teleport.
-HUD controlled for instant and easy access to all functions.
-Includes regular (astride), sidesaddle and mermaid/man riding poses. Poses can be changed via the HUD.
-Climbing, diving and jumping animations.
-Sculpted prim construction, with animated tail and fin (can be turned off).
-Periodically bubbles from the mouth with a bubbly sound (can be turned off).
-Eyes look around and the eyelids smoothly blink together at random times.
-Real life seahorses can change colours, but yours can also individually change eye, harness, tack and saddle colours. Easy to use colour change HUD allows for a near limitless variety of colours to suit your tastes.
-Leaps at the surface in a realistic arc with spray and sound.
-Free swim mode allows the seahorse to ignore the water level and fly wherever you like!
-Water level can be changed to allow for swimming/leaping in non-Linden water (such as swimming pools)
-Variable speed controlled by a slider on the HUD.
Come visit the tropical island of Lionsgate and take a demo for a swim today!
http://slurl.com/secondlife/Caledon%20Lionsgate/85/10/30
yrs, etc
Kamilah Hauptmann, Posture Is Everything Animations
Virrginia Tombola, Cheval Verite/La Bicyclette Horses
Tuesday, November 11, 2008
Never Forget
Dulce Et Decorum Est

Bent double, like old beggars under sacks,
Knock-kneed, coughing like hags, we cursed through sludge,
Till on the haunting flares we turned our backs
And towards our distant rest began to trudge.
Men marched asleep. Many had lost their boots
But limped on, blood-shod. All went lame; all blind;
Drunk with fatigue; deaf even to the hoots
Of disappointed shells that dropped behind.

GAS! Gas! Quick, boys!-- An ecstasy of fumbling,
Fitting the clumsy helmets just in time;
But someone still was yelling out and stumbling
And floundering like a man in fire or lime.--
Dim, through the misty panes and thick green light
As under a green sea, I saw him drowning.
In all my dreams, before my helpless sight,
He plunges at me, guttering, choking, drowning.

If in some smothering dreams you too could pace
Behind the wagon that we flung him in,
And watch the white eyes writhing in his face,
His hanging face, like a devil's sick of sin;
If you could hear, at every jolt, the blood
Come gargling from the froth-corrupted lungs,
Obscene as cancer, bitter as the cud
Of vile, incurable sores on innocent tongues,--
My friend, you would not tell with such high zest
To children ardent for some desperate glory,
The old Lie:
Dulce et decorum est
Pro patria mori.
-Wilfred Owen

Tuesday, October 28, 2008
Thank you, Susan B.
And all the rest of you who were ridiculed, ostracized, even imprisoned and mistreated for daring to say that your voice was as important as a man's.
So, for those of you who are U.S. citizens, mail in your ballot today, or trot down to the polls on the 4th. Don't ever forget how hard the right was to win. Most of our great great grans have passed on now, but let's not let them down.
P.S. Boys should vote, too.


So, for those of you who are U.S. citizens, mail in your ballot today, or trot down to the polls on the 4th. Don't ever forget how hard the right was to win. Most of our great great grans have passed on now, but let's not let them down.
P.S. Boys should vote, too.


Wednesday, October 15, 2008
Low Prim Static Appaloosa

I apologize for not putting this on the market sooner, and I'm sure I have a good excuse :) Anyway, he's only 16 prims, actually 3 less than his Static Arabian cousin. I gave him a "heads up" posture, perfect for alertly sticking his snuzzle out of his paddock.
As always, you can find it on sale at the Carriage House in Caledon Eyre:
http://slurl.com/secondlife/Caledon%20Eyre/48%20/183/23/
Monday, October 6, 2008
Thoughts From Those Who Ought Not Drink Coffee
We are all constantly reaching a certain age
When the Door to the Kingdom shuts behind us
And we half glance over our shoulder to see
That it’s too late, really
We know of that Other Girl in the choir
Who is asked to step up for the solo
And her family coos and the reception people smile
And we ourselves aren’t asked back the next year
And we fall off the balance beam
To the merriment of all
And the world tells us that no matter how we try
We’ll never be the sparkle make-up wearing ingénue
Arching tall upon the mat as the crowds cheer
And so we shuffle our way forwards
Wondering if the next year might hold
A turn in the woods
Beyond which lies
A gold stone path
And the day comes
When we are too old to be Dorothy
We will never meet the Wizard
But then again
We don’t fear the Monkeys
For the world loves the young
To cherish
And to eat
But only the choice ones are taken
And the rest are let alone on the kerb
With my plain mucked shoes dangling
Over the gutter water of time
I pull my feet underneath myself
And step into the rain
To drown
Perchance to dream

Friday, October 3, 2008
The Next Project....
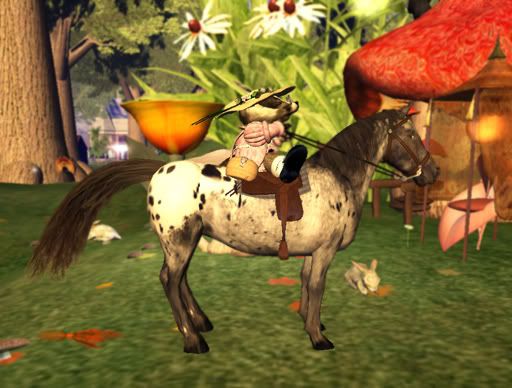
For the last day or so, I've been working with the Mistress of Tinies, Ms. Martini Discovolante on downsizing. Fortunately, in our Virtual World, that word has pleasanter connotations than it might in the workaday environs. Here, it simply means that those poor Badger might not find themselves constantly blurring those bitty feet to catch up with everyone else!
Monday, September 29, 2008
Have a Batty October
I am giving away Battys for FREE throughout the month of October. He's a silly thing, really, but I like him. Wear him as an attachment (he won't wander away) He bobs about and flaps his wings--you can also make him talk if you wish.

Just look for the sign to the left as you enter the Carriage House:
http://slurl.com/secondlife/Caledon%20Eyre/48%20/183/23/
Have a Batty Halloween!
Edit: YAY! I just found my inspiration on YouTube!!! I WUV TEH INTERNETS!!!

Just look for the sign to the left as you enter the Carriage House:
http://slurl.com/secondlife/Caledon%20Eyre/48%20/183/23/
Have a Batty Halloween!
Edit: YAY! I just found my inspiration on YouTube!!! I WUV TEH INTERNETS!!!
Saturday, September 27, 2008
Picture, Not From in an Exhibition
A huge thank you to Vicerine Kamilah Hauptmann who had this done for me. I try not to indulge my vanity by having sketches done of myself or my avatar, but having one done by someone else is more than welcome :)

(Lord, not for the first time do I wish I could get my RL hair to look like that...but I can't fly in RL either!)

(Lord, not for the first time do I wish I could get my RL hair to look like that...but I can't fly in RL either!)
Monday, September 15, 2008
Oh Fine, Another Meme
What, no Girl Gadgeteer photo? Hrmph....
You are the Gadgeteer, the embodiment of steampunk technology. Ironically, many of the things that most define your style are probably too large to easily carry about, but given the opportunity you would prefer to be seen surrounded by boiler engines, gear-driven calculators, and incredible automata. Of all the steampunk fashion styles, you place the greatest emphasis on technological accessories, and you are the most likely to create elaborate gadgets that are as much a part of your outfit as your clothes. You probably have goggles, but unlike most people you consider them to be for more than decoration. Whereas most people might look odd carrying a satchel of tools around, for you they may well be essential. Above all, you remind everyone that what sets the genre apart from Victoriana is simply the level of technology.
It tells me that I am 36% Elegant, 52% Technological, 50% Historical, 24% Adventurous and 40% Playful, which sounds about right. Possibly a tad high on the Technological, as these days I spend more time with Fuzzy Beasts than Silly Gadgets. But I do love my Silly Gadgets, too.
If you care to take the test yourself, do find it here:
http://www.helloquizzy.com/tests/the-steampunk-style-test
Your result for The Steampunk Style Test...
The Gadgeteer

You are the Gadgeteer, the embodiment of steampunk technology. Ironically, many of the things that most define your style are probably too large to easily carry about, but given the opportunity you would prefer to be seen surrounded by boiler engines, gear-driven calculators, and incredible automata. Of all the steampunk fashion styles, you place the greatest emphasis on technological accessories, and you are the most likely to create elaborate gadgets that are as much a part of your outfit as your clothes. You probably have goggles, but unlike most people you consider them to be for more than decoration. Whereas most people might look odd carrying a satchel of tools around, for you they may well be essential. Above all, you remind everyone that what sets the genre apart from Victoriana is simply the level of technology.
It tells me that I am 36% Elegant, 52% Technological, 50% Historical, 24% Adventurous and 40% Playful, which sounds about right. Possibly a tad high on the Technological, as these days I spend more time with Fuzzy Beasts than Silly Gadgets. But I do love my Silly Gadgets, too.
If you care to take the test yourself, do find it here:
http://www.helloquizzy.com/tests/the-steampunk-style-test
Tuesday, September 9, 2008
Skulls About the Town
Well, I'm pleased to say that the skulls have been selling very well. It's really wonderful to hear about the creative things people have been doing with them.
Here's a couple of snapshots I received recently, the first from a Ms. Fallacy DeCuir of FDS designs who made one that emits glowing skull shaped particles, and the obligatory candle skulls:

And everyone's favourite Evil Overlord cum Mad Scientist, Dr. Obolensky, has created this little vacation retreat in Clockspire cove:

Finally, a bit of "Haunted Mansion" style fun from Cald Stine. He was kind enough to send me the haunted grave--I must say the chuckle is rather unnerving!


As always, hearing that people are having fun with my toys really makes me happy :) So if you have pictures of you and your skulls, horses, or unsafe modes of transportation, do drop me a line :)
Monday, August 18, 2008
Home Again, Home Again

Over 100 IMs O_O. Well, good to know I was somewhat missed. Now feel free to lob such missives as need lobbing at me!
Saturday, August 9, 2008
On Holiday

Hello all, my valise (well, beat up plastic roll aboard) is laid out in front of me and I am ready to depart tomorrow morning on a Grand Adventure. More of a working vacation than anything else (I plan on doing a fair bit of writing), but it will be fun enough. Who knows, it may lead to Paths of Glory. Or at least get me out of the house for a week.
In any event, shall be back the week of the 18th, so if anyone has any product requests or issues, I'm afraid it will have to wait until then as I have made the decision Not To Check Email. I need a bit of mind clearing time, so no email, reading LOLCats, watching videos, reading the paper, and decidedly no Second Lifing. I hope I survive the experience!
Until then!
Thursday, August 7, 2008
Skulls for Sale! Getcha Craniums 'Ere!
Well, not everyone has the time to sculpt their own skulls (link!), so I am now selling my skulls on the open market, specifically at the Dark Victorian Emporium in Caledon Tanglewood. Do stop by there if your tastes run towards black taffetta--there are some amazing works there by some top notch creators (i.e. not just my silly skulls).
The pricier one here is the full perm set, for use by vendors who wish to incorporate them in their own builds:

I am also selling no-copy versions which come with four skulls (for private use), or copy versions (for those who want to build with them, but don't intend to sell their builds).
I am also selling this silly set:

Touch the skull and the Raven squawks "Nevermore!" as voiced by our own talented Mr. Hotspur O'Toole (for some reason, I always did imagine that bird having a bit of a husky Northeastern US accent).
Again, all these and many more things by far more talented designers than I are available at the Dark Victorian Emporium (including a lovely Poppins avatar created by Mr. AM Radio).
http://slurl.com/secondlife/Caledon%20Tanglewood////
And....coming soon (but probably after I return from holiday, as one never knows with scripted items):

Friday, July 18, 2008
Oooh, yet another online test
Well, not sure about the accuracy of this one, but I liked the card:
(Found courtesy of Hibernia On the Skids. Thank for finding yet another bit of internet sillyness, Mr. O'Toole!)

You are The Empress
Beauty, happiness, pleasure, success, luxury, dissipation.
The Empress is associated with Venus, the feminine planet, so it represents,
beauty, charm, pleasure, luxury, and delight. You may be good at home
decorating, art or anything to do with making things beautiful.
The Empress is a creator, be it creation of life, of romance, of art or business. While the Magician is the primal spark, the idea made real, and the High Priestess is the one who gives the idea a form, the Empress is the womb where it gestates and grows till it is ready to be born. This is why her symbol is Venus, goddess of beautiful things as well as love. Even so, the Empress is more Demeter, goddess of abundance, then sensual Venus. She is the giver of Earthly gifts, yet at the same time, she can, in anger withhold, as Demeter did when her daughter, Persephone, was kidnapped. In fury and grief, she kept the Earth barren till her child was returned to her.
What Tarot Card are You?
Take the Test to Find Out.
(Found courtesy of Hibernia On the Skids. Thank for finding yet another bit of internet sillyness, Mr. O'Toole!)
Thursday, July 17, 2008
Bitty Wheel Keeps on Turning....
Timid Mary keeps on smouldering!

A small but amazing well done craft here by Mrs. Carricre Wind (aka "Mama Cree") for the soon to be opened Relay For Life sim in Heroes 34. Visitors will take a Mississippi themed journey, thematically reflecting the experiences of the battle with cancer. AND you get to ride one of these paddlewheels, if you like. I was fortunate enough to see it the other day, as I made a few of the fish for the sim, and trust me, it's beyond amazing already. Just remember to go into the advanced environmental settings and turn the water brown :)

A small but amazing well done craft here by Mrs. Carricre Wind (aka "Mama Cree") for the soon to be opened Relay For Life sim in Heroes 34. Visitors will take a Mississippi themed journey, thematically reflecting the experiences of the battle with cancer. AND you get to ride one of these paddlewheels, if you like. I was fortunate enough to see it the other day, as I made a few of the fish for the sim, and trust me, it's beyond amazing already. Just remember to go into the advanced environmental settings and turn the water brown :)
Friday, July 11, 2008

Thursday, July 10, 2008
Ker-Splash!

Well, a bout with a cold led to a flurry of building. I finally learnt how to make skins, and put this avatar together.
A complete avatar, the Purple Beta includes a sculpted tail, skin, modifiable shape, hair, and the sculpted modesty shells. I also included a modesty set of extra scales for strategic areas, as I found that some mermaid sitting poses allowed a bit too much skin to be seen around the shells :P
Thanks to my friend Miss Jacquelin Seisenbacher of Ein Kleineschwein Designs for the wonderful hair work. Frankly the set is probably worth getting just for her hair alone.
I'm selling this for 100L in Relay For Life vendors only, with all proceeds going to the American Cancer Association. Said vendor can be found in Caledon Lionsgate here:
http://slurl.com/secondlife/Caledon%20Lionsgate/158/116/48
While the avatar set does not include an AO, right next to the vendor is another from which you can get Duchess Kamilah Hauptmann's amazing mermaid AO for only a 50L Relay for Life donation. The avatar was designed with this AO in mind--unlike most, it recognizes the water surface and allows for multiple swimming speed and FANTASTIC jumping animations, complete with water spray and sound.
Safe Waters!
Sunday, July 6, 2008

Saturday, July 5, 2008
Making a Skull in Zbrush: Texturing
Welcome back! I’m now going to continue where I left off. The following objectives may seem like an awful lot, but really, it's all very simple.
This time around, hopefully you will learn:
*How to set material on your object.
*How to use the Zproject brush to transfer premade textures to the object.
*How to use the color picker to select colors for polypainting.
*How to polypaint, using the different brush strokes and settings.
*How to use alphas to create realistic painting effects.
*How to change said color to a texture, and use said texture for final sculpting.
*How to export that texture and the object for use in Second Life.
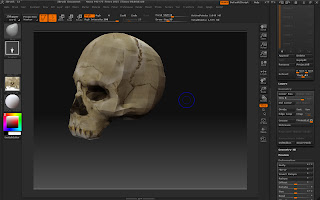
If you recall, we had just sculpted a nice red wax skull. We save this as a Ztool (not an object just yet), then watch Vlad Bjornson’s tutorial on how to use Zproject to polypaint :D
Just to recap, however, I will review the use of the Zproject brush here. First we need to change the material of the skull. The material really won’t do anything to the actual texture we create, but it affects what we see in Zbrush. In other words, while the final texture colour is independent of the material colour, whilst we are working on it, the material will change how the texture looks to use. Long explanation short, red wax makes the texture look red, so we want something nice and white such as White Matcap.
Just as we did when we changed the material of the sphere before sculpting, make sure “M” is on, select White Matcap from the materials palette, go up to “color” and “Fill Object”. Now, make a new document (Cntrl-N, or go to “document” at the top). Go to the texture palette and import a nice texture you want to put on the skull, select Flat Color for the material, then crop and fill the texture to the background. I used some copyright free images of skulls that I bought online, but I believe Wikipedia Commons has some nice common domain images of various skulls. It doesn’t have to be human, just look for some nice bone textures and cracks.
Next, select “texture off” on the texture palette, White Matcap on material palette, and select our skull. Draw it out, then go to edit (hotkey T). Open up the geometry palette, and click it five times. If you look at the upper right, you will see that you have about a million active points.
Make sure Rgb is on, and Zadd/Zsubtract/Zcut are all off. Select the Zproject brush and set RgbIntensity to 100 Position the skull over the image, and run the Zproject brush over it. The texture underneath will transfer to the skull. Rotate and scale the skull as needed to cover the key parts of the skull with bone textures. You can also use the transpose handle to more precisely place textures. Go to Move (hotkey W) and then draw the handle from where you want the texture to the part of the texture you wish to transfer (think of Photoshop’s Clone brush). Go back to Draw (hotkey Q) and Zproject away!
After a while, this is what I came up with.
Not bad, but it looks a tad flat and pasted together, not to mention the fact that large parts are still not textured. This is where we go to more traditional style painting in Zbrush.
First, let’s pick a color to paint. There are two basic ways to pick color in Zbrush: either by picking one from the color picker or by using the “eyedropper” to select one from the image. In the lower left corner you will see the color picker.
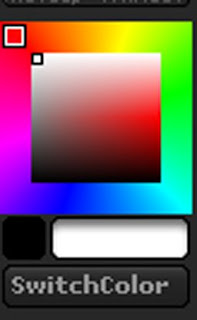
The outside square is where one picks the color. Click on the desired color, and it becomes the active color. The central box controls luminosity and saturation. Again, click on the desired color. Like Photoshop, there are two colors stored, the active one the brush is using (in the big box below the picker) and the secondary one (in the small box). You can swap between those two colors whenever you wish by clicking “SwitchColor”.
Personally, though, I find myself using the eyedropper more, as it guarantees a good match. Click on the box in the color picker, then drag the mouse/pen over to any point on the object or background, then release the button (lift the pen). The color at that point will become the active color.
So, let’s pretty the skull up. First, select the Standard brush, which is what one uses for painting most of the time. Make sure only the Rgb button is selected on top, set the RgbIntensity to about 30 and the size to about 35. Underneath the brush type you will see the icon for the stroke, which is probably still at the default “dots”. Click on this and select “Drag Rec”. This is a nifty brush that will draw out a rectangle as you run it over the object. Try it, and you’ll see what I mean.
So, I selected various colours from the skull and started filling in the empty spots and increasing the shading underneath the skull (remember, once a color is selected, you can adjust luminosity and saturation). The key to making things look realistic is multiple washes. Natural things are rarely one blocky colour. So, take your time, pick a few different colours and set them at a medium RgbIntensity.
Now, let’s do some final touch up. Here’s some things I did. The nose shading got a bit outside, so I picked a color next to it to cover it up. But again, I didn’t want a blocky look, so I need a way to break up the texture. Here is where I used “alphas”. Think of these like the nozzle on a pastry bag—they screen off the brush, creating interesting effects. Here, I just wanted a pebbly look, so I clicked on Alpha (below the brush type) and selected Alpha 7. I went back to the dot brush, and started lightly painting around the nose.
Finally, I wanted a bit of a porous look to the bone, so I picked a dark shade and a low RgbIntensity. But I wanted even more variation, so I selected “color spray” out of the brush types, which automatically provides a bit of variation in color. I worked my way over the skull to make it look nice and rough.
And there we have our basic texture! In the texture subpalette in the tool palette on the right, select “Col>Txr”. You will see a picture of the texture appear on the left under “texture” (I really, really hate the way Pixologic reuses names for different palettes!!!! Whoops, I said that before). Click on that and select “Export”. Now your texture is saved as a PSD file.
We can now do a few final tweaks to our skull, using the texture as a reference. Open up our original saved Ztool of the skull, from just before we divided its geometry in order to paint. Set the material to Matcap White if it isn’t, and go the texture palette on the left, and select the skull texture we just made. It will look a bit blockier, as it hasn’t the resolution of the Ztool we used to create the texture. So, we may have to adjust it slightly using our sculpting tools. I frequently will use the Move brush and Nudge brush to make sure ridges (such as the brows) have a nice row of vertices running along them. Notice that when you switch brush types, the texture disappears. To get it to reappear, simply open the texture palette and reselect the texture. It then becomes that brush’s texture, and you can proceed as before.
Once you’re satisfied, save the new skull as a Ztool. I discussed Sculpty Maker in my tutorial on animation, and it will work just fine here, too. To use that, simply export the Ztool as an Obj file, then open SculptyMaker, browse to the object file and click “make sculpty”. It will create a BMP sculpty file. If you haven't used Sculpty Maker before, I have a more detailed explanation here
Believe it or not, there’s an even easier way to do this now. 2K Suisei created a plug in for ZBrush called ZSculpty. Go here to download it:
http://www.mediafire.com/?ixxoxsizyx0
Then, using your unzipping thingee (I use WinZip these days), unzip the files to something that looks like this:
C:\Program Files\Pixologic\ZBrush3\ZStartup\ZPlugs
(it might not be exactly there on your computer, just make sure you send it to the ZPlugs folder)
Then restart ZBrush and load your skull, draw it out, then go to edit mode. On the right hand Tool palette, all the way at the bottom, you will see “Sculpty”. Just click on that and you will see this palette:
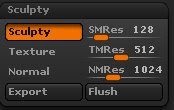
Click on the “Sculpty” button to turn it on, and set the SMRes to your desired sculptmap size. I’ve been using 128 lately with good results and load times, even when not lossless. Note that 2K has also set this up so that you may export the object’s texture as well as a normal map (which is a bit like the bumpmaps we use in Second Life, but not really. One will note I didn’t say I understood them!). Anyway, once set, click “export” and it will create a BMP sculpt map for the selected object. Said sculpt map can be found in the ZSculpty Maps folder, also located in the Zplugs folder. If it gets too cluttered there, you can click “flush” and ZSculpty will delete all the sculpt maps inside.
So, there we have it: a lovely little skull, all textured and everything. Next time, I will talk about how to use a program called Material Baker to create additional shading for our skull, which will make it look even spiffer!
This time around, hopefully you will learn:
*How to set material on your object.
*How to use the Zproject brush to transfer premade textures to the object.
*How to use the color picker to select colors for polypainting.
*How to polypaint, using the different brush strokes and settings.
*How to use alphas to create realistic painting effects.
*How to change said color to a texture, and use said texture for final sculpting.
*How to export that texture and the object for use in Second Life.
If you recall, we had just sculpted a nice red wax skull. We save this as a Ztool (not an object just yet), then watch Vlad Bjornson’s tutorial on how to use Zproject to polypaint :D
Just to recap, however, I will review the use of the Zproject brush here. First we need to change the material of the skull. The material really won’t do anything to the actual texture we create, but it affects what we see in Zbrush. In other words, while the final texture colour is independent of the material colour, whilst we are working on it, the material will change how the texture looks to use. Long explanation short, red wax makes the texture look red, so we want something nice and white such as White Matcap.
Just as we did when we changed the material of the sphere before sculpting, make sure “M” is on, select White Matcap from the materials palette, go up to “color” and “Fill Object”. Now, make a new document (Cntrl-N, or go to “document” at the top). Go to the texture palette and import a nice texture you want to put on the skull, select Flat Color for the material, then crop and fill the texture to the background. I used some copyright free images of skulls that I bought online, but I believe Wikipedia Commons has some nice common domain images of various skulls. It doesn’t have to be human, just look for some nice bone textures and cracks.
Next, select “texture off” on the texture palette, White Matcap on material palette, and select our skull. Draw it out, then go to edit (hotkey T). Open up the geometry palette, and click it five times. If you look at the upper right, you will see that you have about a million active points.
Make sure Rgb is on, and Zadd/Zsubtract/Zcut are all off. Select the Zproject brush and set RgbIntensity to 100 Position the skull over the image, and run the Zproject brush over it. The texture underneath will transfer to the skull. Rotate and scale the skull as needed to cover the key parts of the skull with bone textures. You can also use the transpose handle to more precisely place textures. Go to Move (hotkey W) and then draw the handle from where you want the texture to the part of the texture you wish to transfer (think of Photoshop’s Clone brush). Go back to Draw (hotkey Q) and Zproject away!
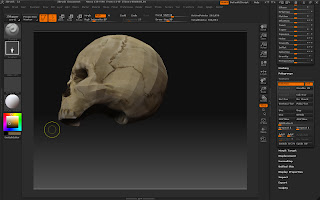
After a while, this is what I came up with.

Not bad, but it looks a tad flat and pasted together, not to mention the fact that large parts are still not textured. This is where we go to more traditional style painting in Zbrush.
First, let’s pick a color to paint. There are two basic ways to pick color in Zbrush: either by picking one from the color picker or by using the “eyedropper” to select one from the image. In the lower left corner you will see the color picker.

The outside square is where one picks the color. Click on the desired color, and it becomes the active color. The central box controls luminosity and saturation. Again, click on the desired color. Like Photoshop, there are two colors stored, the active one the brush is using (in the big box below the picker) and the secondary one (in the small box). You can swap between those two colors whenever you wish by clicking “SwitchColor”.
Personally, though, I find myself using the eyedropper more, as it guarantees a good match. Click on the box in the color picker, then drag the mouse/pen over to any point on the object or background, then release the button (lift the pen). The color at that point will become the active color.
So, let’s pretty the skull up. First, select the Standard brush, which is what one uses for painting most of the time. Make sure only the Rgb button is selected on top, set the RgbIntensity to about 30 and the size to about 35. Underneath the brush type you will see the icon for the stroke, which is probably still at the default “dots”. Click on this and select “Drag Rec”. This is a nifty brush that will draw out a rectangle as you run it over the object. Try it, and you’ll see what I mean.
So, I selected various colours from the skull and started filling in the empty spots and increasing the shading underneath the skull (remember, once a color is selected, you can adjust luminosity and saturation). The key to making things look realistic is multiple washes. Natural things are rarely one blocky colour. So, take your time, pick a few different colours and set them at a medium RgbIntensity.

Now, let’s do some final touch up. Here’s some things I did. The nose shading got a bit outside, so I picked a color next to it to cover it up. But again, I didn’t want a blocky look, so I need a way to break up the texture. Here is where I used “alphas”. Think of these like the nozzle on a pastry bag—they screen off the brush, creating interesting effects. Here, I just wanted a pebbly look, so I clicked on Alpha (below the brush type) and selected Alpha 7. I went back to the dot brush, and started lightly painting around the nose.
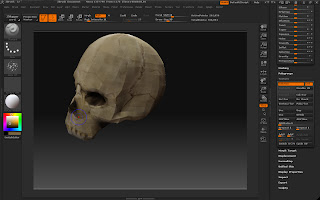
Finally, I wanted a bit of a porous look to the bone, so I picked a dark shade and a low RgbIntensity. But I wanted even more variation, so I selected “color spray” out of the brush types, which automatically provides a bit of variation in color. I worked my way over the skull to make it look nice and rough.

And there we have our basic texture! In the texture subpalette in the tool palette on the right, select “Col>Txr”. You will see a picture of the texture appear on the left under “texture” (I really, really hate the way Pixologic reuses names for different palettes!!!! Whoops, I said that before). Click on that and select “Export”. Now your texture is saved as a PSD file.
We can now do a few final tweaks to our skull, using the texture as a reference. Open up our original saved Ztool of the skull, from just before we divided its geometry in order to paint. Set the material to Matcap White if it isn’t, and go the texture palette on the left, and select the skull texture we just made. It will look a bit blockier, as it hasn’t the resolution of the Ztool we used to create the texture. So, we may have to adjust it slightly using our sculpting tools. I frequently will use the Move brush and Nudge brush to make sure ridges (such as the brows) have a nice row of vertices running along them. Notice that when you switch brush types, the texture disappears. To get it to reappear, simply open the texture palette and reselect the texture. It then becomes that brush’s texture, and you can proceed as before.
Once you’re satisfied, save the new skull as a Ztool. I discussed Sculpty Maker in my tutorial on animation, and it will work just fine here, too. To use that, simply export the Ztool as an Obj file, then open SculptyMaker, browse to the object file and click “make sculpty”. It will create a BMP sculpty file. If you haven't used Sculpty Maker before, I have a more detailed explanation here
Believe it or not, there’s an even easier way to do this now. 2K Suisei created a plug in for ZBrush called ZSculpty. Go here to download it:
http://www.mediafire.com/?ixxoxsizyx0
Then, using your unzipping thingee (I use WinZip these days), unzip the files to something that looks like this:
C:\Program Files\Pixologic\ZBrush3\ZStartup\ZPlugs
(it might not be exactly there on your computer, just make sure you send it to the ZPlugs folder)
Then restart ZBrush and load your skull, draw it out, then go to edit mode. On the right hand Tool palette, all the way at the bottom, you will see “Sculpty”. Just click on that and you will see this palette:

Click on the “Sculpty” button to turn it on, and set the SMRes to your desired sculptmap size. I’ve been using 128 lately with good results and load times, even when not lossless. Note that 2K has also set this up so that you may export the object’s texture as well as a normal map (which is a bit like the bumpmaps we use in Second Life, but not really. One will note I didn’t say I understood them!). Anyway, once set, click “export” and it will create a BMP sculpt map for the selected object. Said sculpt map can be found in the ZSculpty Maps folder, also located in the Zplugs folder. If it gets too cluttered there, you can click “flush” and ZSculpty will delete all the sculpt maps inside.
So, there we have it: a lovely little skull, all textured and everything. Next time, I will talk about how to use a program called Material Baker to create additional shading for our skull, which will make it look even spiffer!
Thursday, July 3, 2008
Making a Skull in Zbrush

Hullo, the following is part one of a skull tutorial I am working on. Hopefully, after pawing your way through the following, you should be able to:
*Use a reference image to assist with modeling
*Use different levels of division to create an organized sculpting workflow
*Use the subtool menu to group objects together, and be able to manipulate them and edit them individually
*Understand the difference between texture and color, and color individual subtools
*Use symmetry when sculpting
*Use the various sculpting brushes for their various purposes
*Make a cute skull
Before beginning, I really recommend you either already know the basics about how to load up Zbrush and create a basic object, or watch part one of Vlad Bjornson's excellent tutorial here:
http://www.shiny-life.com/2008/02/12/video-creating-sculpted-prims-with-zbrush-3/
Final note, should you wish to see any of the pictures below up close, click on them to get the full size image.
Onto the tutorial!
*****
I have been working through the tutorials in the book “Introducing Zbrush” by Keller of late, and I cannot recommend the book highly enough. More than simply explaining what all the buttons do, it also covers the basics of sculpting and creating. Part of making good 3D characters (such as horses!) is understanding the underlying anatomical structure, and to that end, he has a terrific tutorial on crafting a human skull. Yes, perhaps a bit macabre, but we’ve all got one underneath our coiffures, so there is no sense in being overly squeamish.
While I certainly recommend getting the book, none of the tutorials in it are importable to Second Life, outside of creating a PSD file and importing the image as a texture (Oh, go ahead and frame that lovely seascape on the wall of your home :)). So, I’ve attempted to cover the same ground as the skull tutorial, but oriented towards an object file that will be usable in Second Life. Essentially, it means working with a Sphere3D instead of the PolySpheres, less sculpted detail and a greater reliance on texturing to convey depth and roughness.
With no further ado, let’s get started. First things first, we ought look at multiple pictures of skulls from different angles (don’t we love Google images?) and from those create reference images of a front and side. It really helps to have at least a picture of the skull up in the background to look at, but as you will see, our sketch will help enormously in shaping. It needn’t be beautiful, it is simply for reference.
After we sketch the sides, go to the graphics program of your choice and open up the file “imagePlaneX.PSD”, located in the Ztools directory (the one that looks like the one below):

Then, in another layer, put the front and side view of the skull and move them about until they are centred on the words “FRONT” and “SIDE”. Make sure the front and side views are to scale and at the right height. Guidelines with the rulers visible will help here. Hide the background layer with the words on it and save the file as a PSD file. You may feel free to use my example, if you like.

Now onto Zbrush! First, select “Fast Shader” in the materials palette on the left, and make sure the texture is off. Then go to the tools palette, load a Sphere3D, draw it on the canvas, go to Edit mode (hotkey T) and initialize the sphere to HDivide 8 and VDivide 9, and then click “Make Polymesh”. (If this sounds like gibberish, do trot over to Vlad Bjornson’s Shiny Things site and watch the introduction to Zbrush tutorial. Unlike mine, his has nice music ;)).
Now, go back to the tool palette, and “load tool”. In the Ztools folder, select “imagePlaneX”. Our sphere will turn into an X. You will notice that if we rotate this around, it will sometimes disappear. That is because planes only have one side. To keep the sides always visible, go to “display properties” on the right hand side, fourth up from the bottom (it’s part of the tool palette). Expand that and click “double” and you will see both sides of the plane surfaces.
Now, go to “Texture”, import texture, and select our reference image.
La!

Now, lets get our sphere that we will be sculpting on. Underneath the Tool subpalette in the tool palette (Pixologic REALLY needs to work on not reusing names!), find the subtool palette and open it. Click “append” and select our 8x9 Sphere3D (not the default one, which has a kagillion vertices).
Problem one, your sphere is probably not lined up with our reference planes. To fix this, click on the sphere icon in the subtool palette (make sure both eyeball icons are on, so you can see both of the objects). It will be highlighted with a dark rectangle around it, meaning that is the tool you will be able to modify.
Next, go to our old friend the deformations palette (you did watch Vlad’s tutorial, didn’t you?), and look at the Unify command. Make sure x, y and z are all selected and click it. Both tools now have the same pivot, orientation and size. In English, they are lined up.

But wait, they both have the same texture! Now we could sculpt on the sphere with the reference image stretched over it, but that would be silly and confusing. Instead we need to understand the difference betwixt TEXTURE and COLOR. A texture is overlaid on top of an object, and is not influenced by the painting tools. Its resolution is a function of how many pixels it was saved as, and is independent of the underlying object. Think of it as gift wrapping stretched tightly over our object. A color is actually part of the object. Each vertex has a color, which is then applied to the neighboring polygons. So, the more polygons, the greater the resolution of a color.
The key thing for our current concern is that all subtools share a texture, but can have different colors (or colours. But Pixologic is non-U, as the Hon. Nancy Mitford might put it). So, short story long, we need to change this texture to a color.
First, click on the PlaneX icon in the subtool menu to make it the active tool. Next, click on the eyeball next to the sphere to make that tool disappear (otherwise the texture will be turned into a color for it, too).
Now, remember that resolution of the color depends on the number of vertices. Go to the geometry subpalette in the tools palette, and make sure “Smt” is turned off (the button next to “divide”). If Smt (smooth) is active, it will “smooth” the object as we give it detail, which will make our planes rounded. Click the divide button five times so we have plenty of available detail. Open up the texture subpalette on the right side (not to be confused with the texture palette on the top. See earlier complaint about reuse of names...). Click “Txr>Clr”. The texture is now a color. The only change you are likely to see is that the texture icon on the Left side (not to be confused with either the texture palette or subpalette) will no longer display the texture but simply say “texture off”.
Click on the eyeball next to the sphere icon on the subtool menu, and you will see the sphere. But really, fast shader isn’t my favourite material for sculpting, and I want some contrast with the reference planes. So, let’s change the material!
First, make the sphere the active tool, then turn off the visibility for the plane (ie, click the eyeball). Now for the cute part. On the top bar, to the right of the Move/Scale/Rotate controls make the “M” is highlighted, and not “Mrgb” or “Rgb”. On the left, click the material and select something easy to work with that contrasts with grayish white (red clay or wax is good). On the VERY top line, third from the left, click on color, and find “fill object”. Click it.
Go back to the subtool menu and unhide the planeX. You should see this:

(I know, this was a lot of work, but it makes the actual process SO much easier when you get going)
There is one final issue before we start sculpting. You will notice that the “poles” of the sphere are facing us. The problem with that is that the poles tend to scrunch textures up and are hard to make look right when doing detailed sculpting. And we’ve got one right in the face, quite literally. We’d rather have the poles on the low detail top of the skull and hidden underneath.
First, rotate the whole tool by dragging off of it on the canvas, while holding the shift key down. The tool will “snap” to an orthogonal position (in other words, it isn’t crooked). Now we will rotate the sphere alone.
Click on “rotate” (hotkey R), then double tap/click on the very front vertex, as shown in the above picture.
Then go to the side of the tool, and click on one of the circles and drag it to the centre of the skull. You have now set up a “transpose handle”. I discuss this a bit more in my animation tutorial, but here, the basic idea is that one end of this line becomes the pivot point. Click on the outside circle and drag it so the pole rotates nicely to the middle of the “X” of the planes.

And there you have it. Believe it or not, this was really the hard part. Like so many things, Zbrush sculpting is 76% preparation. The rest of this will be pure fun, so stick with me!
You may have wondered why we started with an 8x9 sphere, rather than a 32x33 sphere. After all, the latter has much more detail available to use. It’s a tad hard to answer directly, but the thing is that in all forms of art, one starts with big blocks and adds detail later. We see overall shape and form first, and if we haven’t laid the fundamentals of that down from the beginning, the overall composition will suffer. I admit to being quite the student when it comes to visual art, and had never really done this before a few months ago. But then I read a few books (what a startling concept!) I started making roughs out, then filling them in with placeholder outlines, and then finally filling in the detail. And I am here to say that it is MUCH easier that way. Similarly, whilst working on this project, even at the blocky levels of things, do not concentrate on one part at a time. Constantly rotate the object while sketching it out. Again, this will help you preserve the overall form of things.
Enough theory! Go to the top, and select the Move brush from the brush palette. Click OFF those Mrgb, Rgb, M, Zadd and Zcut buttons, and click Zadd ON. Whenever you switch brushes, make sure that is the configuration they are in. Go to the transformation palette and click symmetry, X and M (for mirrored on the X axis). Now, any alterations you make to one side of the skull will be done to the other.
Go to the brush palette on the very top (not the one with the brush picture, but the word “brush” between “alpha” and “color”). Open it, find “backface mask” and click it on. Now changes will only happen on the side of the object you can see.
Now we want to be able to see our reference image, so let’s make the subtool semi-transparent by clicking on the “transp” button on the bottom of the right shelf. You can now see through the sphere to plane. At this stage of things, I find it helpful to see all the vertices, so while you are there, click on “frame”, located next to the transparency button. You will see all the vertices, as well as the lines that connect them.
Go to the subtool palette and click on the sphere to make it active. Now all changes will be applied to the sphere ONLY. This is the important part of using subtools! Note that moving, rotation and scale (via dragging the mouse or using the right shelf buttons) will still be applied to all the subtools. To move, rotate or scale an individual subtool requires use of a transpose handle, as we saw when we rotated the pole.
Now, let’s sculpt! On the right top, next to the Zadd button, you will see the brush settings. We will start with big changes, so let’s set “Z intensity” all the way up at 100 and brush size at 50. Leave focal shift for now, it controls the amount of “falloff” and is basically like the hardness control on a Photoshop brush. “Rgb intensity” will be greyed out, as we turned Rgb off since we aren’t painting yet. When it is on, it works like the opacity setting on a Photoshop Brush.
Now, using the move brush gently pull the vertices in line with our image. Start with the vertices closest to you, then work your way outwards towards the edges. Resist the temptation to “mash” things. Small strokes are the way to win the day (and if you didn’t want a tablet before, you will when you are done with this).
Once you have the outline, try to get the frame lines lined up with your features. Look at how the vertices roughly trace the outlines of the nose, eyes and upper jaw in this picture:

On the side, push in the temple a bit (there is this really frightening looking hollow there!) by switching to the standard brush and holding the alt key down. Make sure the lines follow the zygomatic bone (that bone that starts at the eye and goes backwards, outlining the temporal depression).

From the top, the head should resemble a rounded wedge

Now, let’s add a tad more detail. Go to the geometry palette and click “divide”. You will want to reduce the brush size to about 35 and strength to about 25.
The smooth brush can be instantly activated by holding down the shift key. It averages out the vertices, literally “smoothing” them. This is very useful for making nice even, lined up frame lines and vertices (which we want for good texturing and sculpting). 100 will obliterate most detail, however, so to decrease the strength of the smooth brush, select it and change Z intensity to 20.
Now, go back to moving the vertices, taking care to keep them in line with the features of the skull. Try to outline the nose and teeth, and start a shallow depression over the eyes. Bring out the cheekbones and the rough outline of the zygomatic bone. Gently curve the lines over the brow, and lightly touch the Standard brush there (be careful not to make our skull look too cavemanish :P)

Now, let’s do the final touches, to really make this object look skullish. At this point, we really don’t need the reference plane anymore, so go ahead and open the subtool menu and turn the eyeball next to the plane off. Deactivate frame and add any final touches. You may find you need to occasionally toggle off symmetry should you need to work on one side of the skull only.
Now, go to the geometry subpalette and click divide one last time. You are now at the number of vertices you need for object import into Second Life. In the upper right, next to “draw size” you will see that it says “Total Points 1056”. If you are ever in doubt as to whether you are at the right number of vertices for exporting the object file, take a look up there and adjust your division level accordingly.
Also note that you can feel free at any time to go back down to a lower division level to make big changes, then go back up to the higher level. Just move the division slider to the left to go down, right to go back up. Our workflow is to start large and work towards more detail, but nothing is written in stone.
Now, hopefully with a few pictures of real skull to look at we add more detail. I can’t tell you exactly which brush strokes to use, or which brushes. Just keep trying different brushes at different settings, and find out what works for you. A Z intensity of 25 to 50 seems to work well, with finishing touches at 5 to 10. Brush size will vary from 15 for grabbing a single vertex to 50 for large area changes (but be careful with those!). To change the brush size instantly, use the bracket keys ( “[“ and “]”) to size it up and down.
If you ever want a quick overview of a brush, hover your cursor over its icon and hold the control key. Zbrush will give you a pop up window explaining what it does.
Most of the time, you will use the Standard brush, which pulls the object surface out, or if the alt key is held, pushes it in. Use that to create the hollows for the nose, eyes, and underneath, the foramen magnum (the hole the spinal cord goes into).
The Move brush will continue to get a good workout, but also think about the Nudge brush, which moves vertices parallel to the surface of the skin. It literally can “nudge” a feature into position.
Final touches can now be provided. The Flatten brush will make the various plane surfaces less pillowy and more skullish. The Pinch brush will sharpen edges by bringing vertices together. The Inflat brush will inflate things (or deflate with the Alt key). Use it at a low Z intensity of 10 or less to lightly round the top of the skull. Finally, smooth where necessary. Whatever you do, avoid crossing the skin over itself, that will look simply ugly when you import the skull to Second Life, and is blessed near impossible to texture correctly.

Well, there we have our base skull! I’m going to have a rest now, but next time I will talk a bit about how to texture using the brush tools and the Material Baker plugin. If you haven’t seen it, go see Vlad Bjornson’s tutorial on texturing in Zbrush on his Shiny Life website, as I will assume you already have the basics of that down pat.
Till then!
Woooooooooo....SCARY SKULLL!!!!!
Subscribe to:
Posts (Atom)