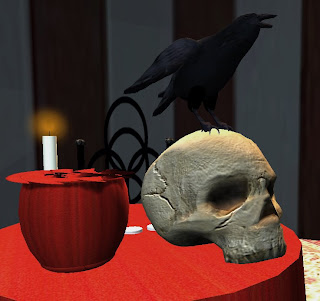
Hullo, the following is part one of a skull tutorial I am working on. Hopefully, after pawing your way through the following, you should be able to:
*Use a reference image to assist with modeling
*Use different levels of division to create an organized sculpting workflow
*Use the subtool menu to group objects together, and be able to manipulate them and edit them individually
*Understand the difference between texture and color, and color individual subtools
*Use symmetry when sculpting
*Use the various sculpting brushes for their various purposes
*Make a cute skull
Before beginning, I really recommend you either already know the basics about how to load up Zbrush and create a basic object, or watch part one of Vlad Bjornson's excellent tutorial here:
http://www.shiny-life.com/2008/02/12/video-creating-sculpted-prims-with-zbrush-3/
Final note, should you wish to see any of the pictures below up close, click on them to get the full size image.
Onto the tutorial!
*****
I have been working through the tutorials in the book “Introducing Zbrush” by Keller of late, and I cannot recommend the book highly enough. More than simply explaining what all the buttons do, it also covers the basics of sculpting and creating. Part of making good 3D characters (such as horses!) is understanding the underlying anatomical structure, and to that end, he has a terrific tutorial on crafting a human skull. Yes, perhaps a bit macabre, but we’ve all got one underneath our coiffures, so there is no sense in being overly squeamish.
While I certainly recommend getting the book, none of the tutorials in it are importable to Second Life, outside of creating a PSD file and importing the image as a texture (Oh, go ahead and frame that lovely seascape on the wall of your home :)). So, I’ve attempted to cover the same ground as the skull tutorial, but oriented towards an object file that will be usable in Second Life. Essentially, it means working with a Sphere3D instead of the PolySpheres, less sculpted detail and a greater reliance on texturing to convey depth and roughness.
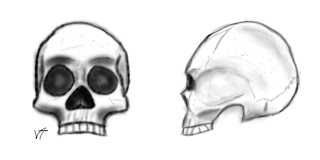
With no further ado, let’s get started. First things first, we ought look at multiple pictures of skulls from different angles (don’t we love Google images?) and from those create reference images of a front and side. It really helps to have at least a picture of the skull up in the background to look at, but as you will see, our sketch will help enormously in shaping. It needn’t be beautiful, it is simply for reference.
After we sketch the sides, go to the graphics program of your choice and open up the file “imagePlaneX.PSD”, located in the Ztools directory (the one that looks like the one below):
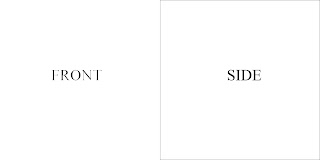
Then, in another layer, put the front and side view of the skull and move them about until they are centred on the words “FRONT” and “SIDE”. Make sure the front and side views are to scale and at the right height. Guidelines with the rulers visible will help here. Hide the background layer with the words on it and save the file as a PSD file. You may feel free to use my example, if you like.
Now onto Zbrush! First, select “Fast Shader” in the materials palette on the left, and make sure the texture is off. Then go to the tools palette, load a Sphere3D, draw it on the canvas, go to Edit mode (hotkey T) and initialize the sphere to HDivide 8 and VDivide 9, and then click “Make Polymesh”. (If this sounds like gibberish, do trot over to Vlad Bjornson’s Shiny Things site and watch the introduction to Zbrush tutorial. Unlike mine, his has nice music ;)).
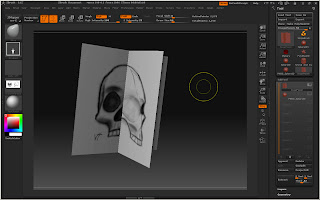
Now, go back to the tool palette, and “load tool”. In the Ztools folder, select “imagePlaneX”. Our sphere will turn into an X. You will notice that if we rotate this around, it will sometimes disappear. That is because planes only have one side. To keep the sides always visible, go to “display properties” on the right hand side, fourth up from the bottom (it’s part of the tool palette). Expand that and click “double” and you will see both sides of the plane surfaces.
Now, go to “Texture”, import texture, and select our reference image.
La!
Now, lets get our sphere that we will be sculpting on. Underneath the Tool subpalette in the tool palette (Pixologic REALLY needs to work on not reusing names!), find the subtool palette and open it. Click “append” and select our 8x9 Sphere3D (not the default one, which has a kagillion vertices).
Problem one, your sphere is probably not lined up with our reference planes. To fix this, click on the sphere icon in the subtool palette (make sure both eyeball icons are on, so you can see both of the objects). It will be highlighted with a dark rectangle around it, meaning that is the tool you will be able to modify.
Next, go to our old friend the deformations palette (you did watch Vlad’s tutorial, didn’t you?), and look at the Unify command. Make sure x, y and z are all selected and click it. Both tools now have the same pivot, orientation and size. In English, they are lined up.
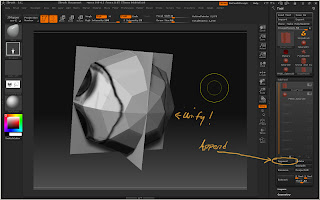
But wait, they both have the same texture! Now we could sculpt on the sphere with the reference image stretched over it, but that would be silly and confusing. Instead we need to understand the difference betwixt TEXTURE and COLOR. A texture is overlaid on top of an object, and is not influenced by the painting tools. Its resolution is a function of how many pixels it was saved as, and is independent of the underlying object. Think of it as gift wrapping stretched tightly over our object. A color is actually part of the object. Each vertex has a color, which is then applied to the neighboring polygons. So, the more polygons, the greater the resolution of a color.
The key thing for our current concern is that all subtools share a texture, but can have different colors (or colours. But Pixologic is non-U, as the Hon. Nancy Mitford might put it). So, short story long, we need to change this texture to a color.
First, click on the PlaneX icon in the subtool menu to make it the active tool. Next, click on the eyeball next to the sphere to make that tool disappear (otherwise the texture will be turned into a color for it, too).
Now, remember that resolution of the color depends on the number of vertices. Go to the geometry subpalette in the tools palette, and make sure “Smt” is turned off (the button next to “divide”). If Smt (smooth) is active, it will “smooth” the object as we give it detail, which will make our planes rounded. Click the divide button five times so we have plenty of available detail. Open up the texture subpalette on the right side (not to be confused with the texture palette on the top. See earlier complaint about reuse of names...). Click “Txr>Clr”. The texture is now a color. The only change you are likely to see is that the texture icon on the Left side (not to be confused with either the texture palette or subpalette) will no longer display the texture but simply say “texture off”.
Click on the eyeball next to the sphere icon on the subtool menu, and you will see the sphere. But really, fast shader isn’t my favourite material for sculpting, and I want some contrast with the reference planes. So, let’s change the material!
First, make the sphere the active tool, then turn off the visibility for the plane (ie, click the eyeball). Now for the cute part. On the top bar, to the right of the Move/Scale/Rotate controls make the “M” is highlighted, and not “Mrgb” or “Rgb”. On the left, click the material and select something easy to work with that contrasts with grayish white (red clay or wax is good). On the VERY top line, third from the left, click on color, and find “fill object”. Click it.
Go back to the subtool menu and unhide the planeX. You should see this:
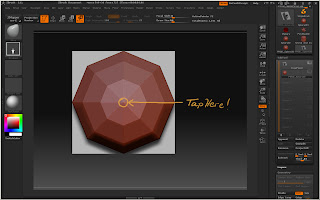
(I know, this was a lot of work, but it makes the actual process SO much easier when you get going)
There is one final issue before we start sculpting. You will notice that the “poles” of the sphere are facing us. The problem with that is that the poles tend to scrunch textures up and are hard to make look right when doing detailed sculpting. And we’ve got one right in the face, quite literally. We’d rather have the poles on the low detail top of the skull and hidden underneath.
First, rotate the whole tool by dragging off of it on the canvas, while holding the shift key down. The tool will “snap” to an orthogonal position (in other words, it isn’t crooked). Now we will rotate the sphere alone.
Click on “rotate” (hotkey R), then double tap/click on the very front vertex, as shown in the above picture.
Then go to the side of the tool, and click on one of the circles and drag it to the centre of the skull. You have now set up a “transpose handle”. I discuss this a bit more in my animation tutorial, but here, the basic idea is that one end of this line becomes the pivot point. Click on the outside circle and drag it so the pole rotates nicely to the middle of the “X” of the planes.
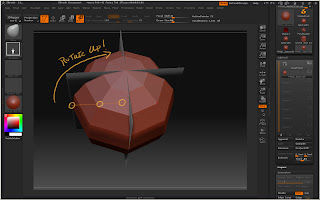
And there you have it. Believe it or not, this was really the hard part. Like so many things, Zbrush sculpting is 76% preparation. The rest of this will be pure fun, so stick with me!
You may have wondered why we started with an 8x9 sphere, rather than a 32x33 sphere. After all, the latter has much more detail available to use. It’s a tad hard to answer directly, but the thing is that in all forms of art, one starts with big blocks and adds detail later. We see overall shape and form first, and if we haven’t laid the fundamentals of that down from the beginning, the overall composition will suffer. I admit to being quite the student when it comes to visual art, and had never really done this before a few months ago. But then I read a few books (what a startling concept!) I started making roughs out, then filling them in with placeholder outlines, and then finally filling in the detail. And I am here to say that it is MUCH easier that way. Similarly, whilst working on this project, even at the blocky levels of things, do not concentrate on one part at a time. Constantly rotate the object while sketching it out. Again, this will help you preserve the overall form of things.
Enough theory! Go to the top, and select the Move brush from the brush palette. Click OFF those Mrgb, Rgb, M, Zadd and Zcut buttons, and click Zadd ON. Whenever you switch brushes, make sure that is the configuration they are in. Go to the transformation palette and click symmetry, X and M (for mirrored on the X axis). Now, any alterations you make to one side of the skull will be done to the other.
Go to the brush palette on the very top (not the one with the brush picture, but the word “brush” between “alpha” and “color”). Open it, find “backface mask” and click it on. Now changes will only happen on the side of the object you can see.
Now we want to be able to see our reference image, so let’s make the subtool semi-transparent by clicking on the “transp” button on the bottom of the right shelf. You can now see through the sphere to plane. At this stage of things, I find it helpful to see all the vertices, so while you are there, click on “frame”, located next to the transparency button. You will see all the vertices, as well as the lines that connect them.
Go to the subtool palette and click on the sphere to make it active. Now all changes will be applied to the sphere ONLY. This is the important part of using subtools! Note that moving, rotation and scale (via dragging the mouse or using the right shelf buttons) will still be applied to all the subtools. To move, rotate or scale an individual subtool requires use of a transpose handle, as we saw when we rotated the pole.
Now, let’s sculpt! On the right top, next to the Zadd button, you will see the brush settings. We will start with big changes, so let’s set “Z intensity” all the way up at 100 and brush size at 50. Leave focal shift for now, it controls the amount of “falloff” and is basically like the hardness control on a Photoshop brush. “Rgb intensity” will be greyed out, as we turned Rgb off since we aren’t painting yet. When it is on, it works like the opacity setting on a Photoshop Brush.
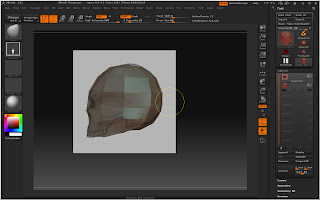
Now, using the move brush gently pull the vertices in line with our image. Start with the vertices closest to you, then work your way outwards towards the edges. Resist the temptation to “mash” things. Small strokes are the way to win the day (and if you didn’t want a tablet before, you will when you are done with this).
Once you have the outline, try to get the frame lines lined up with your features. Look at how the vertices roughly trace the outlines of the nose, eyes and upper jaw in this picture:
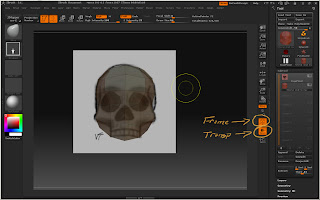
On the side, push in the temple a bit (there is this really frightening looking hollow there!) by switching to the standard brush and holding the alt key down. Make sure the lines follow the zygomatic bone (that bone that starts at the eye and goes backwards, outlining the temporal depression).
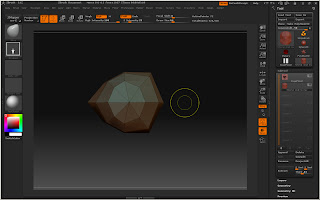
From the top, the head should resemble a rounded wedge
Now, let’s add a tad more detail. Go to the geometry palette and click “divide”. You will want to reduce the brush size to about 35 and strength to about 25.
The smooth brush can be instantly activated by holding down the shift key. It averages out the vertices, literally “smoothing” them. This is very useful for making nice even, lined up frame lines and vertices (which we want for good texturing and sculpting). 100 will obliterate most detail, however, so to decrease the strength of the smooth brush, select it and change Z intensity to 20.
Now, go back to moving the vertices, taking care to keep them in line with the features of the skull. Try to outline the nose and teeth, and start a shallow depression over the eyes. Bring out the cheekbones and the rough outline of the zygomatic bone. Gently curve the lines over the brow, and lightly touch the Standard brush there (be careful not to make our skull look too cavemanish :P)
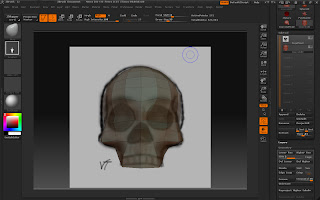
Now, let’s do the final touches, to really make this object look skullish. At this point, we really don’t need the reference plane anymore, so go ahead and open the subtool menu and turn the eyeball next to the plane off. Deactivate frame and add any final touches. You may find you need to occasionally toggle off symmetry should you need to work on one side of the skull only.
Now, go to the geometry subpalette and click divide one last time. You are now at the number of vertices you need for object import into Second Life. In the upper right, next to “draw size” you will see that it says “Total Points 1056”. If you are ever in doubt as to whether you are at the right number of vertices for exporting the object file, take a look up there and adjust your division level accordingly.
Also note that you can feel free at any time to go back down to a lower division level to make big changes, then go back up to the higher level. Just move the division slider to the left to go down, right to go back up. Our workflow is to start large and work towards more detail, but nothing is written in stone.
Now, hopefully with a few pictures of real skull to look at we add more detail. I can’t tell you exactly which brush strokes to use, or which brushes. Just keep trying different brushes at different settings, and find out what works for you. A Z intensity of 25 to 50 seems to work well, with finishing touches at 5 to 10. Brush size will vary from 15 for grabbing a single vertex to 50 for large area changes (but be careful with those!). To change the brush size instantly, use the bracket keys ( “[“ and “]”) to size it up and down.
If you ever want a quick overview of a brush, hover your cursor over its icon and hold the control key. Zbrush will give you a pop up window explaining what it does.
Most of the time, you will use the Standard brush, which pulls the object surface out, or if the alt key is held, pushes it in. Use that to create the hollows for the nose, eyes, and underneath, the foramen magnum (the hole the spinal cord goes into).
The Move brush will continue to get a good workout, but also think about the Nudge brush, which moves vertices parallel to the surface of the skin. It literally can “nudge” a feature into position.
Final touches can now be provided. The Flatten brush will make the various plane surfaces less pillowy and more skullish. The Pinch brush will sharpen edges by bringing vertices together. The Inflat brush will inflate things (or deflate with the Alt key). Use it at a low Z intensity of 10 or less to lightly round the top of the skull. Finally, smooth where necessary. Whatever you do, avoid crossing the skin over itself, that will look simply ugly when you import the skull to Second Life, and is blessed near impossible to texture correctly.
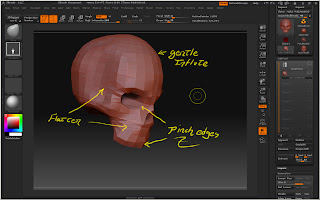
Well, there we have our base skull! I’m going to have a rest now, but next time I will talk a bit about how to texture using the brush tools and the Material Baker plugin. If you haven’t seen it, go see Vlad Bjornson’s tutorial on texturing in Zbrush on his Shiny Life website, as I will assume you already have the basics of that down pat.
Till then!
Woooooooooo....SCARY SKULLL!!!!!
9 comments:
When it comes to the step where I am to fill in the red clay I end up making the skull paper red as well, I had to change it back to simple shader, but the red clay stayed on the ball as it should.
Missed step in the how to?
A second problem has me stopped mid way, right before the fun part of actually sculpting. When it comes tot using the rotation tool, It will not work on the sphere, it only works on the skull reference, which means in the end I can't move the center pixels out of the skull's face.
I'm using Zbrush 3.1
three hours later I figured it out x.x
In the earlier steps I hadn't noticed the copy we'd be pulling the second mesh from was sized and set to polymorph before it was put into Zbrush, so my second object was never a polymesh, and when I attempted to enable that it would clear all the work.
Starting over from step 1 properly helped things, still I do not know how you set your rotation poin -inside- the sphere, I had to go through it twice more, the second time I tried not to muck with the point already centered inside it, then carefully rotating around it I moved the circles til I could rotate it up like you had and continue the project.
Is there a hotkey/trick to selecting the center point at the center of the tool?
Hullo Glenn! Lord, it's not as if *I* haven't done that about three hundred times. Knowing whether one has set the polymesh is very important, and yet Zbrush seems to make it as inexplicable as possible. The one thing I look at is whether it has a PMD at the start of the new name of the tool. If it still just says "Sphere 3D", you haven't set the polymesh yet. But me, I often remember when I try a deformation, then wonder why nothing is happening :P
A hotkey for starting the transpose handle in the tool centre WOULD be handy, wouldn't it? But what I was trying to show is what I do. Rotate the tool whilst holding the shift key, so that it snaps to an orthogonic thingee. Then tap with the pen in the middle of the tool (or mouse, fairly certain it would work the same). The transpose handle with be there, with all three circles on top of each other. Pull the end to the edge of your tool, using the shift key to make it move orthogonally (I just learnt that trick this week :)) Rotate the tool with the shift key again, so you are looking at it 90 degrees off your original angle. Then pull the circles so that they are all in the centre on top of each other.
I think I made that sound complicated, but really, the idea is simple to see the handle head on from one angle and stretched out along your rotation axis from the other.
When you get done, I'd love to see your skull!
I'm having issues with the first step: Importing my PSD file onto the X planes. I followed your steps exactly but when I import the texture, nothing seems to happen. I'm wondering if there's something that I'm doing wrong but I can't figure it out. Is there some trick I'm missing?
I have zBrush 3.12 for Mac OSX
Hullo Six, do you mean it never showed up when you imported the texture and selected it, or do you mean it disappeared when you went col>>txt? If the latter, you needed to up the division level to a few hundred thousand points before clicking col>>txt
The texture never showed up on the imageplaneX when I imported the texture. I saw no change and don't know what I'm doing wrong.
To Six:
I'm just beginning to learn Zbrush and I found too that when I followed the instructions to import the texture and select it, nothing happened...
I clicked a bunch of things :-) and finally when I selected Texture Map from the tools menu and selected the skull reference file, the image appeared on the "X". I hope this was the right thing to do... but it seems a step was missing in the tutorial.
I also am now having the same trouble as Glenn, with the paper and the sphere both turning the same colour as the red clay.
Thank you very much.
Very clear tutorial (better than others).
Thank you SO much for putting this up! I found your blog happenstance and have thought about ways to use my skills as a graphic artist AND sculptor want-to-be....well...you gave me the answer! lol I'm in Second Life as well...I'll have to come by and see your shop. Thank you again! :D
Post a Comment