The ramblings of Miss Virrginia Tombola, Victorian Bicycle Shop Owner, Equestrienne, Aviatrix and Seamstress in the oft extremely peculiar world of Second Life.
Truthfully, the closest I have ever got to oil painting is the splattery mess on my stove when I stir fry things. Watercolour? Isn't that what happens when you forget to put a coaster down? But I am happy to abuse Photoshop filters to simulate having artistic talent! Here are a examples of Adobe fun (click on the picture for a full size photo--the filter effects are rather lost in the thumbnails):
In all seriousness, playing about with Zbrush lately has made me think more about creating dioramas in Second Life. A bit of a poor woman's Bryce, as it were. Import the three dimensional models and textures, some of which can be added later on in Photoshop. And of course, unlike Bryce, one can waddle about in one's diorama later on! Hardly original thinking--brilliant artists such as AM Radio and the NPIRL set have been doing this for some time already. But for me, it is opening up some ideas for future fun :)
(13 June: I've updated the workflow for SubTool Master, so you may wish to look at it again. The short version is each subtool needs a different name)
Well, I decided to try to have a go at another tutorial. I do apologize as always for my lack of experience with this sort of thing—I’m hardly a Natalia Zelmanov or Vlad Bjornson.
Speaking of the latter gentleman in question, I understand that he is working on a tutorial regarding creating multipart objects in Zbrush, then assembling them inworld using 2K Suisei’s newest version of his excellent “Sculpty Maker”, which is possibly the most user friendly importer I have seen to date in Second Life.
So, I have decided to have a go at explaining how to use Zbrush subtools and Mr. S’s importer to create animated sculpts. Truly, it isn’t that hard!
The first thing you need to do is learn how to use Zbrush! Fortunately, you can get your feet wet for nothing at all. Pixologic has a free thirty day trial that you can download here: http://www.pixologic.com/zbrush/trial/
After downloading the trial, pop over to Vlad’s site and play about with making textured sculpties. He has many good tutorials there, but for the purposes of this exercise, you will only need to know how to make a basic sculpt with texturing, as shown in this tutorial: http://www.shiny-life.com/2008/02/12/video-creating-sculpted-prims-with-zbrush-3/
Now, you will need to download the Sculpty Maker: http://www.mediafire.com/?23dx9xoemmg
There isn’t much to look at there! It’s an extremely streamlined interface. After unzipping it, all you will have is a folder marked Sculpty Maker (if you don’t know how to unzip programs, you can get a free 45 day trial of WinZip here: http://www.winzip.com/downwz.htm). The icon marked “Sculpty Maker.exe” is the one you will click on to start the program. More on that later.
Next you will need a “plug in” from Pixologic called SubTool Master. Go here and download it: http://www.zbrushcentral.com/zbc/showthread.php?t=057154
I found installation of the SubTool Master to be techy. For some reason, my regular unzip program (7-zip) didn’t work, and I ended up using WinZip instead. Make sure you have “use folder names” enabled, which I could only find on the classic interface format for WinZip. I admit to have gotten help with this!). Then find the Pixologic/ZBrush3\ZStartup\ZPlugs folder and drag the entire Subtool Master folder into it. THEN close Zbrush and start it up again. Look for the word “zplugin” on the top of the page, click on it and you should see SubTool Master there. If not, find someone to help you, too ;)
Well, that was fun! I really hate computers somedays. But when they’re working, we get to do fun things like sculpt. So, go forth and sculpt!
Sculpt sculpt sculpt texture texture texture.
I made a fish:
Well, pretty enough, if I do say so myself. But I want it to be fishy and flop its fishy tail and such.
Sooooo....first I save the fish as a Ztool. NOTE!!! I learnt this the hard way!!! Don’t think you can save the Ztool as an Object file and then reimport it to Zbrush, work on it and export it again. Little errors in positioning creep in, and when you animate it, the sculpt will move around a bit.
Now, I rotate the fish so I can see the top, whilst holding down the SHIFT key. This will “snap” the Ztool to a nice up/down alignment, making sure our fish isn’t crooked in SL. Later on, this will be a view I use for aligning the animation.
Next, let’s bend the fish a bit.
First mask off the section that you do NOT want bent (again, watch Vlad’s tutorial to see how to mask things). You may want to blur it, depending on how sharp you want the bend. I didn’t here, but blurring would certainly be apropos for a snake or some other sort of smooth bending thingee. To blur, hold control and click outside the document, or select blur on the mask palette on the right hand side where the geometry and tools palettes are.
Then click on the “rotate” icon up top, near the Edit and Draw buttons you have been using. You will now get the transpose line. You may have used this in Vlad’s tutorial to move textures, but as you will see the more you use Zbrush, it has about a hundred or so uses. Well, at least five. Anyway, here, drag it from the tip of the nose to the base of the tail. This is creating a “bone” for posing purposes, by which the movement of the rest of the model is figured. “Hrum?” you say. Just wait and watch :)
Next, make sure the transpose handle is clearly IN the fish, and not to the side. Rotate the Ztool to make sure this is the case. If you need to move it, click on one of the CIRCLES (not the line itself) and drag it as needed.
Now, to actually pose, click on the middle of the circle, hold the ALT key and drag the mouse or tablet pen. Spiff, eh? It moves like a real creature, even calculating things like skin folds.
If you don’t want Zbrush to calculate anatomical modeling (say, you have a robot), instead drag the line across the unmasked areas. Drag the far end of the transpose handle and you will see the unmasked part rotate, using the other end as the pivot point.
If you need to move the part (if it drifts, for example), you can click on “move” next to the rotate button. Now dragging the transpose handle will move the entire part.
Now my fish is posed how I like, so I save it as a Ztool under a different name, here “bfly left”. Do the same for any other poses.
On to subtools! Subtools are great fun, once you get the hang of them. They allow you to have multiple sculpts all together in the edit window, so that you can see how they fit, and even work with them. For animation, this means we can look at our different poses, one after another, and also make sure that they are in the same space.
So, first go to “load tool” and load the first Ztool (here, the unbent fish I made). Then go to the side menu and open up “subtools”, click “append” then pick the next pose you wish to use. Then do the same for all the poses.
Addendum: 2K Suisei suggests that, rather than make each subtool then later on loading them one by one, simply use the "clone" button on the Tool Palette (just below all the pictures of your tools. This creates a copy of the currently selected subtool. Then pose that one as you like (remember to select that layer by clicking on the subtool), then make another clone, pose that and so on. You could see how this technique would make animating a continuously moving sculpt a breeze!
Addendum: When using SubTool Master to merge subtools for export, it is VERY important to give each subtool a different name. If two tools have the same name, only one will be exported! If you are using the "clone" function to create copies of the tool, it will automatically give each one a new name (CuteSquid #1, CuteSquid #2, etc).
I may wish to do a bit of editing. Here, I decide at the last minute that I want the side fins to flop forward and back, by having them forward in the middle frame. I click on the eyeballs next to all the subtools except the middle frame. Only the middle frame is now visible. This works JUST like layers in Photoshop. Oh, just like layers, click and highlight the subtool you wish to work on.
So, I move the fins forward using the move brush (I could have also have used the transpose handles, but for small bits, the brush is faster). I set the brush size wide, then make sure I am in “draw”, Zadd on (look for the icon next to the brush size at the top). I also have found that I need to select the texture for the object for each tool, to make it a "brush texture", otherwise the tool blanks the texture, and all you will see is the background material (such as matcap white) Then I use my brush to move them forward. Click, push, la (btw, I really have no idea how anyone does this without a tablet pen, but it can be done)
You can also use this time to make sure all the poses are “lined up”. If not, move them with the transpose handle. Now my three fish poses are right on top.
Finally to export!
Turn all the subtools to visible, then go up to the “Zplugin” menu and select Subtool Master. You will get this picture on the left:
Click on “merge”. Save as a Ztool (just in case), then export as an object file.
Close Zbrush (but don’t cry, you’ll be back. Trust me on this).
Now, startup Sculpty Maker, click on Object, navigate in that computer navigable way to the merged object file (it will say Mrg#1_name.OBJ or some such). Then make sure both scale and centre are not clicked, and then click “make sculpty”. Sculpty Maker will inform you that it has made sculpt maps and put them in the same folder as the object file.
Let’s go to SecondLife! We are soooo close. Download the sculpt maps, at the low low price of 10 Lindens each. I HATE to say this, but make sure “lossless” is unchecked. There is a bug right now, and lossless sculpts take too long to rez for animation purposes.
Now make an object. Texture it with your texture you made for your object. Next, edit the object, go to the contents tab, drag the new sculpt maps into the contents, and click “new script”.
Why, hello to you, too, Mr. Prim :P
Then open the new script, and copy paste the following script by 2K Suisei into it, overwriting the base script that is in there: // Animates a sculpty by cycling through the sculptmaps within the contents folder
Click “save” and close the script. The sculpt should be animating, going from one frame to another every .3 seconds. 2K Suisei had it at every .1 seconds, but to be honest, I find that in laggy sims, it seemed to well, lag. One trick to speed up rez time is to take the sculpt map textures and put them on the side of a small prim (a cube has room for 6). Then bury that cube in the animated sculpt. This will “pre-load” the sculpt textures, making them rez faster.
If you want to be able to list the sculpts in the precise order you want, right click on the textures in inventory and copy the UUIDs. Then paste them in order in the following script: string sculptmap; list SCULPTS[“sculptUUID1”,”sculptUUID2”,”etc”]; integer Count; float speed=0.3;//Speed in seconds
Well, being under the waves doesn't mean no building for me :) Good Lord, no, I might end up socializing or some such. So instead, I decided to play with Boids.
What on earth is a Boid? Ms. CoyoteAngel Dimsum mentioned it to me the other day, and showed me this link to a fun discussion about them: http://www.red3d.com/cwr/boids/
Basically, they are what the animation industry uses to model fish schools and bird flocks. The basic algorithm (if I may use such a word in public) has each creature heading towards a point exactly midway between the two nearest other creatures. Then if it collides, it bounces in exactly the opposite direction.
A bit of head scratching and searching later, I found out (fortunately for my math challenged brain) that a few years back, Mr. Apotheus Silverman had created an LSL script replicating the basic Boid model.
A bit of tweaking later, I added it to a few sculpted fish and created a "Fish School Rezzer", here displaying the Water Only mode in the cool lagoon of Lionsgate:
In the spirit of the capitalistic age in which we find ourselves ;), I will be putting these rezzers out for sale soon at the Carriage House.
Still need to add mermaid animations to this, and perhaps teach it a few tricks, but I am overly pleased with the appearance :)
Again a huge thanks to Mr. Vlad Bjornson for his wonderful Zbrush tutorials at http://www.shiny-life.com/, without which I would no doubt still be wondering how to create an object file!
Well, in fact, I have been spending a fair bit of time underwater lately, thanks largely to Vicerine Kamilah Hauptmann's wonderful mermaid AO she recently put out. It's truly amazing--it does not simply run the animations, but controls and augments movement as. Hard to describe easily, suffice to say, it allows for incredibly acrobatic leaps (with particle effects). Better yet, swing by Lionsgate, dive off the platform to the beach below and pick up one for 50 Linden. No, NOT a typo, she is "selling" them for a 50L donation to the Relay For Life American Cancer Society fund raiser.
A more explicit blog entry with lovely pictures is here on her blog: http://kamilahhauptmann.blogspot.com/2008/05/beta-launch-of-navigator-mermaid.html
One of the best things about knowing mad geniuses is the fact that oft one gets to test their toys before the general public gets to see them. Assuming one does not perish in the testing of same, in general a good time is had by all.
And in fact, I have been having a delightful time. I haven't really been that fishy since I sold my Tanglewood plot and lost my grotto, and I'd forgotten how fun it is. There is a whole hidden world beneath the waves I have been neglecting. Well, I knew about the Vernian Sea in Babbage, of course, but did you know there is an underwater temple off the narrow coastline of Regency? No, shan't tell you where, you must look :)
Well, I am inspired by all this, and whilst I enjoy being finny, I did miss my horses. Oddly enough, I haven't seen this in Second Life yet, but I really think a Sea Horse mount would be beyond fun. Besides, I'm fascinated by all the bumps and curves of the wee little beasties. So, call this a sneak preview:
Good day all! Should you detest shameless huckstering, do avert your eyes from this entry and trot on over to the Brass Goggles blog or some other such online confection.
In the meantime, should you find yourself about the stables in Eyre, and you find yourself with an inexplicable need for a chicken, well away, for 100L (beg pardon, I mean the "low low price of 100L, lord only knows how long this screaming deal shall last") you may have a mod copy hen and fuzzy offspring:
Also in the "look but do not ride" category is this grazing Arabian (or drinking, or what have you) for 300L:
I was rather pleased with this one, actually. That is the head that I created as my first Zbrush product.
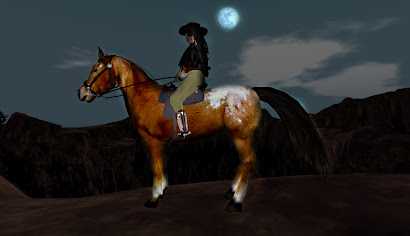
There will be an animated, ridable version of the Arabian. I am only waiting on a new saddle. It will be part of the Western line, along with the Appaloosa. Here's a few "sneak previews" of the Appy. He's a bit ratty, but I think he's cute :)
That's about it for now. I've a few projects on the "back burner" right now, such as the long awaited sculpted centaurs (Miss Seisenbacher has made some wonderful hair for them!), and some more carriages with options. So, as they say, do watch this space!
Happy Birthday to Vi Happy Birthday to Vi Happy Birthday, Dear Miss Paravane (And also to meeeeeeee :P)
Hee, yes, it's both of our RL birthdays, one of life's coincidences. We're even the same RL age (which is old enough to know better, but still young enough not to care, as the saying goes).
So, play horsies on the shelf for the day, I'm off for some real life cake for lunch. No fete in SL, but if you see either of us on this evening, do pop by for a cup of tea (which may do a biblical and transform into wine after 10 or so SLT).